
Postgre와 nodejs(Express.js) 연동 - 2 (모듈화 및 데이터 추출)
앞서 1 코드에서 폴더명을 바꾸었다. config-> db
그리고 db.js를 config.js로 바꾸었다.

이런 형태이다.
1. config.js를 모듈화 하기
const { Pool } = require('pg')

const pool = new Pool(
    {
        host: process.env.POSTGRE_HOST,
        user: process.env.POSTGRE_USER,
        password: process.env.POSTGRE_PW,
        port: process.env.POSTGRE_PORT,
        database: process.env.POSTGRE_DB
    }
)

module.exports = {
    query: (text, params, callback) => {
      return pool.query(text, params, callback)
    },
  }
모듈을 추출하여 다른 js에서도 사용하기 위해 module.exports를 추가 작성하였다. return 값을 pool.query로 지정해주어야만 한다.
참고 : https://node-postgres.com/guides/project-structure
Suggested Project Structure
Whenever I am writing a project & using node-postgres I like to create a file within it and make all interactions with the database go through this file. This serves a few purposes: Allows my project to adjust to any changes to the node-postgres API withou
node-postgres.com
2. query 메서드를 호출하여 값 가져오기
routes> index.js
var express = require('express');
var router = express.Router();
let db = require('../db/config')

/* GET home page. */
router.get('/', function(req, res, next) {

  db.query('SELECT * from student', (err, res) => {
    if(err) {
      return next(err)
    }

    console.log(res.rows)
  })

});

module.exports = router;
세번째 줄에 config.js 모듈을 db라는 변수에 할당하였다.
결과값이 잘 호출됨을 알 수 있다.
이 형태로 사용해도 무방하지만, routes / index.js 가 엄청 길어지고 가독성이 떨어질 것이다.
그래서 쿼리문만 모아둔 js(db.query부분) 를 따로 만들어 코드를 모듈화 해볼 것이다.
모듈화
1. 폴더 db 밑에 index.js 생성
2. db/index.js 쿼리 작성
let db = require('./config')

// student 개수를 반환하는 메서드
async function getStudentCount() {
    let query = 'SELECT COUNT(*) FROM student'

    let result = await db.query(query) // 쿼리 실행
    console.log(result.rows[0].count) // 5

    /* 이렇게 가져오는 방법도 있음 (위에 것과 같은 결과를 반환한다.) */
    // let {rows} = await db.query(query)
    // console.log(rows[0].count)

    let data = result.rows[0].count // 5

    return data
}

// student row들을 리턴하는 메서드
async function getStudentInfo() {
    let query = 'SELECT * FROM student'
    let data = [] // 배열 만듦
    let { rows } = await db.query(query)

    for(let row of rows){ // 배열안에 각각의 객체 삽입
        let node = {
            'idx' : row['idx'],
            'name' : row['name'],
            'age' : row['age'],
            'grade' : row['grade'],
        }
        data.push(node)
    }

    console.log(JSON.stringify(data))
    // [{"idx":1,"name":"김똘똘","age:":10,"grade":"B"},{"idx":2,"name":"이장님","age:":9,"grade":"A"},{"idx":3,"name":"홍길동\r\n","age:":11,"grade":"C"},{"idx":4,"name":"윤뽀뽀","age:":10,"grade":"A"},{"idx":5,"name":"박박","age:":9,"grade":"D"}]
    return data
}


module.exports = {
    getStudentCount,
    getStudentInfo
}
첫번째 줄에 추출했었던 config.js 를 db라는 이름으로 선언했다.
db.query는 promise 함수를 사용하기 때문에 await & async를 잘 사용해주어야 한다.
잘 사용하지 않으면 Promise { <pending> } 이라는 결과값이 뜬다. (메서드와 관련 모든 함수에 관련 키워드를 붙여주어야 한다.)
Result {
command: 'SELECT',
rowCount: 5,
oid: null,
rows: [
{count : '5' }
],
fields: [
Field {
name: 'idx',
tableID: 16591,
columnID: 1,
dataTypeID: 23,
dataTypeSize: 4,
dataTypeModifier: -1,
format: 'text'
},
...
}
이러한 JSON 형태로 만들어 data를 컨트롤러에 반환해준다. 이제 컨트롤러를 보자.
routes/index.js
var express = require('express');
var router = express.Router();
let db = require('../db/index')

/* GET home page. */
router.get('/', async function(req, res, next) {

  const count = await db.getStudentCount();
  console.log('in controller : '  + count) // 5

  const data = await db.getStudentInfo();
  console.log('in controller : '  + data)

  res.render('index', {count: count, data: data})
});

module.exports = router;
세번째 줄에 db/index.js의 모듈을 사용하기 위해 선언하였고,
async, await 처리를 해주었다. 또한 getStudentCount()의 반환값을 count 라는 변수로 받았고
getStudentInfo()의 JSON 객체를 data라는 변수에 담았다.
in controller 콘솔 화면

올바른 값이 출력됨을 알 수 있다.
그 두 값(count, data)을 res.render를 통해 index.ejs 로 넘겨주었다.
views/index.ejs
<!DOCTYPE html>
<html>
  <head>
    <title>index</title>
    <link rel='stylesheet' href='/stylesheets/style.css' />
    <link rel='stylesheet' href='https://cdn.jsdelivr.net/npm/bootstrap@5.1.3/dist/css/bootstrap.min.css' />
    <script src="https://cdn.jsdelivr.net/npm/bootstrap@5.1.3/dist/js/bootstrap.min.js"></script>
    <script src="https://cdn.jsdelivr.net/npm/bootstrap@5.1.3/dist/js/bootstrap.bundle.min.js"></script>
  </head>
  <body>
    <!-- <h1><%= JSON.stringify(data) %></h1> -->
    <h1><%= count %></h1>
    <table class="table">
      <thead>
        <tr>
          <th scope="col">idx</th>
          <th scope="col">name</th>
          <th scope="col">age</th>
          <th scope="col">grade</th>
        </tr>
      </thead>
      <tbody>
        <% for(let i=0; i<data.length; i++){ %>
          <tr>
              <th scope="row"><%= data[i].idx%></th>
              <td><%= data[i].name %></td>
              <td><%= data[i].age %></td>
              <td><%= data[i].grade %></td>
          </tr>
        <% } %>
      </tbody>
    </table>
  </body>
</html>
빠르게 table을 만들기 위해 bootstrap을 이용하여 만들었다. 위에 세가지 cdn을 똑같이 작성해야 한다.
for 반복문을 이용하여 data의 모든 객체를 추출하였다.
결과화면
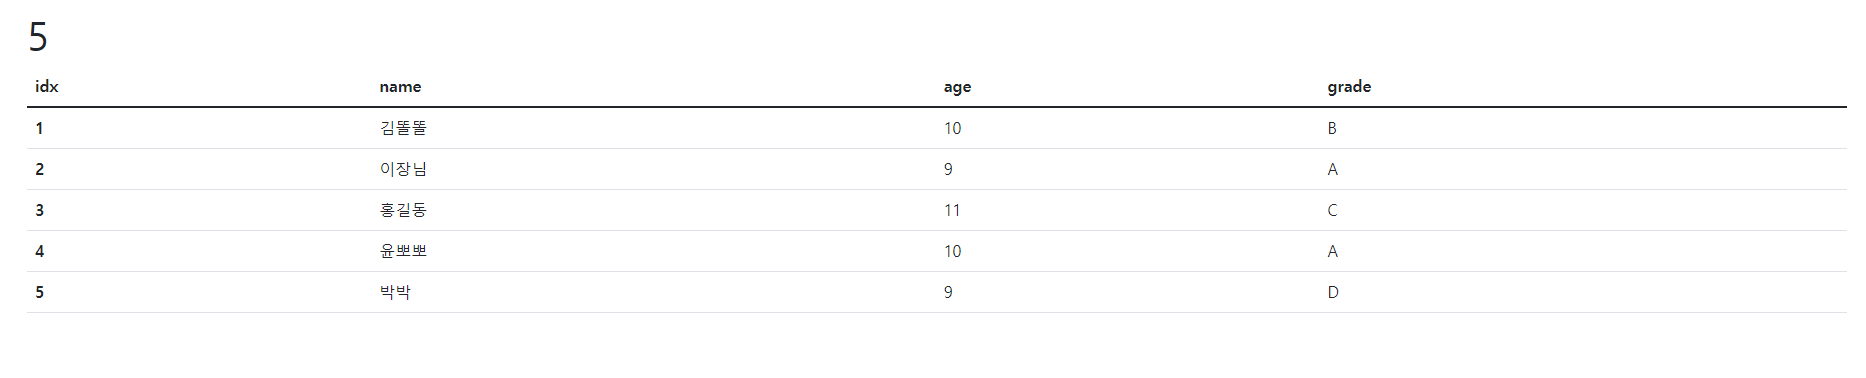
결과가 잘 나옴을 확인 할 수 있다.
관련 소스 : https://github.com/datoybi/blog-posting/tree/main/postgre-connect2
GitHub - datoybi/blog-posting: code examples posted on my blog
code examples posted on my blog. Contribute to datoybi/blog-posting development by creating an account on GitHub.
github.com